Installation of Centos 7 with LVM
Installation of Centos 7 with LVM
Centos 7 is one of the famous open source Linux flavor, it run the same command as Red Hat Linux. Centos officially announce that it is a part of Red Hat since January 2014.
Installation of Centos 7 with LVM means you can resize the partition size as per your need. LVM stands for Logical Volume Manager. In this scenario only single Physical disk is use to create a partitions by using LVM you can take multiple physical disk as per your need.
Concept of LVM is to create a volume group by using single or multiple Hard disk, And inside the volume group create a logical volumes means partitions as per the environment needs.
Benefit of LVM is customize the size of partitions and also increase or decrease the partition size.
This is a virtual machine environment for installation of Centos 7 with LVM, ISO file is using for installation. if you are installing Centos 7 on physical machine you need Bootable DVD or Bootable USB.
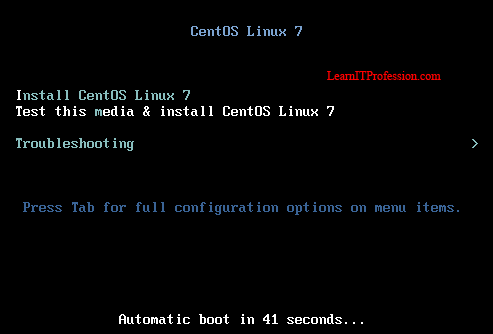
For Installation of Centos 7 with LVM boot machine with an ISO file or bootable device then press enter on Install Centos Linux 7 by use up and down arrow keys.
After press enter Centos 7 image file checking is in progress, you can skip this process by press Esc button on your Keyboard.
After complete the checking process of Centos 7 ISO image file, select the language of Centos Linux 7 machine. By default English Language is selected with English (United States) that is for default keyboard layout. you can choose your own language for the Installation of Centos 7 with LVM.
After select the installation process language configure the installation summary. It's require nine step to complete.
In Step 1 Set the DATE & TIME. Here region set as Asia and City is Karachi, you can set your own region and city. For Enable the Network Time click ON button and also set the Date with Time. After set all the requirements of Date and Time press Done Button.
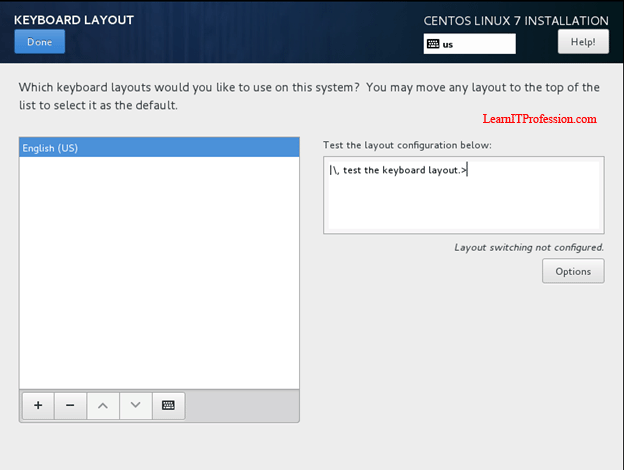
In Step 2 set the layout of the KEYBOARD. By default English (US) is set as Keyboard Layout, You can set as per your requirement. you can also test the keyboard layout that is shown in below image. For exit from the Keyboard Layout setting press Done Button.
In Step 3 set the LANGUAGE SUPPORT. The default language is set in English you can set your own language for the installation of Centos 7 with LVM. After set the Language Support press Done button.
In Step 4 set the INSTALLATION SOURCE, Installation Source is already selected you can test the installation source just click on verify button. For exit from the installation source setting press Done Button.
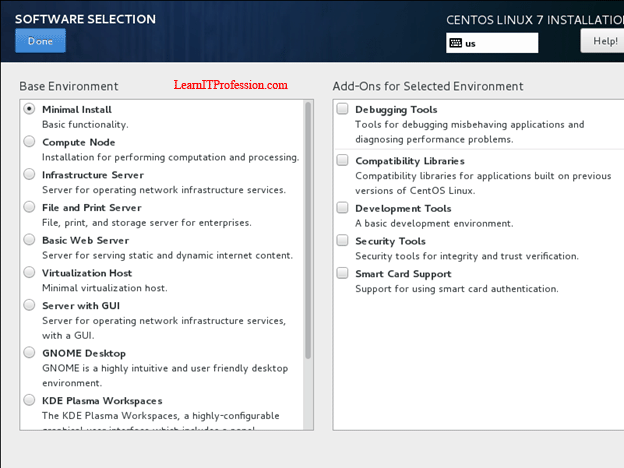
In Step 5 Set the SOFTWARE SELECTION. By default Minimal Install is select with basic functionality for the Installation of Centos 7 with LVM, you can set as per your environment need. After select Software Selection press Done Button.
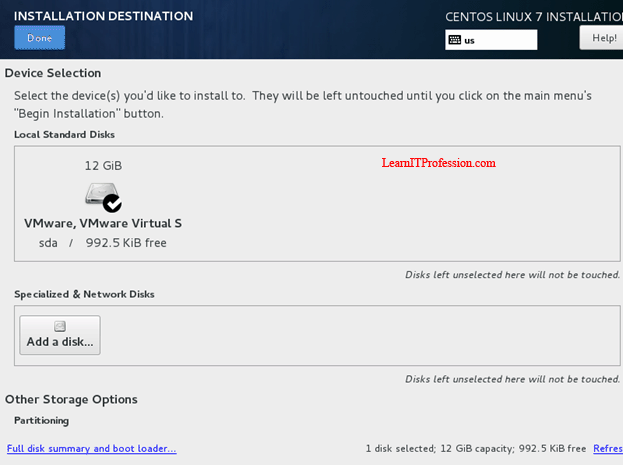
In Step 6 set the INSTALLATION DESTINATION. This is main Step for the Installation of Centos 7 wiith LVM, Here we customize the size of partitions by using LVM (Logical Volume Manager).
In the above image you can see a 12GB single hard drive is use for the Installation of Centos 7 with LVM, you can use the hard drive size as per your need and also use multiple hard drives if you Install Centos 7 with LVM in physical machine otherwise if you are installing on virtual machine you can take maximum space of Hard Drive.
In this scenario the main reason use of LVM is to resize the customize partitions of Centos Linux 7. For manual partitioning of Centos Linux 7 click on "I will configuring Partitioning".
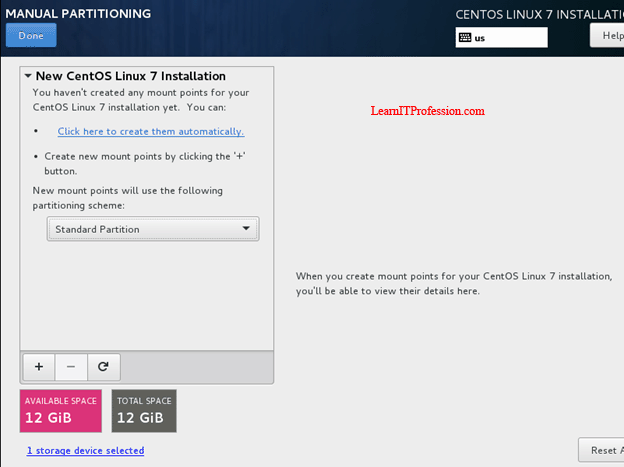
You can see Manual Partitioning Window is open to create the partitions for the Installation of Centos 7 with LVM.
We are creating 7 partitions for the installation of Centos 7 with LVM some partition are fundamental requirement of Centos linux 7 and some partitions are optional.
Fundamental Partitions: root "/", /boot and /home.
Optional Partitions: /var, /srv, /tmp, /swap and etc.
Boot Partition:
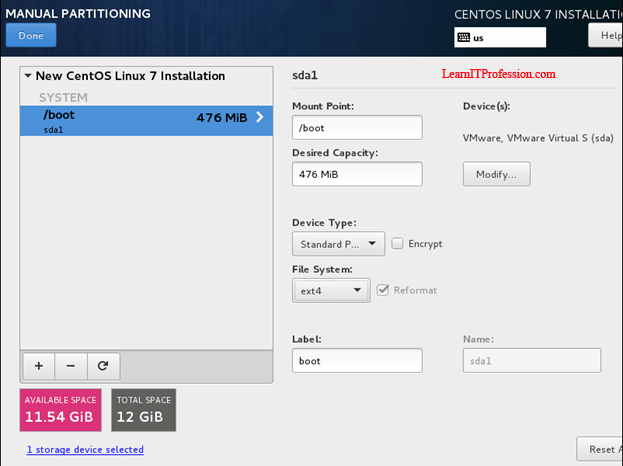
Boot partition contain the Kernal of Operating System and off course is use to boot Centos Linux 7. First we create a boot partition as standard partition because if we create boot partition inside a Volume Group (VG) of Logical Volume Manager (LVM), Centos Linux 7 will not boot or you can say Linux Base OS will not boot.
The requirement of Boot Partition are as follows.
Mount Point: /boot
Desired Capacity: 500mb (Recommend 1GB)
Device Type: Standard Partition
File System: ext4
Label: boot
To create a boot partition click on + button, Set the mount point "/boot" and desired capacity of boot partition. Here desired capacity of boot partition is set to 500mb, you can set capacity of boot partition as per your environment need.
After add the mount point set the device type, file system and lable. The Device Type of boot partition is set as Standard Partition, File System "ext4" and Lable "boot" .
After set all the requirements of boot partitions click on Update Settings.
Root Partition:
Root is the top partition of Linux operating system, for successfully boot the operating system the file system must be mount on root "/" partition.
The requirement of root "/" partition are as follows.
Mount Point: /
Desired Capacity: 7GB (Set as per your environment need)
Device Type: LVM
Volume Group: NEWLVMGROUP
File System: ext4
Label: root
For create root "/" partition click on + button, Set the Mount Point is "/" and Desired Capacity as per your environment need". Here desired capacity is set to 7GB.
After set the mount point and desired capacity click on Add mount point. Now set the device type, file system and lable.
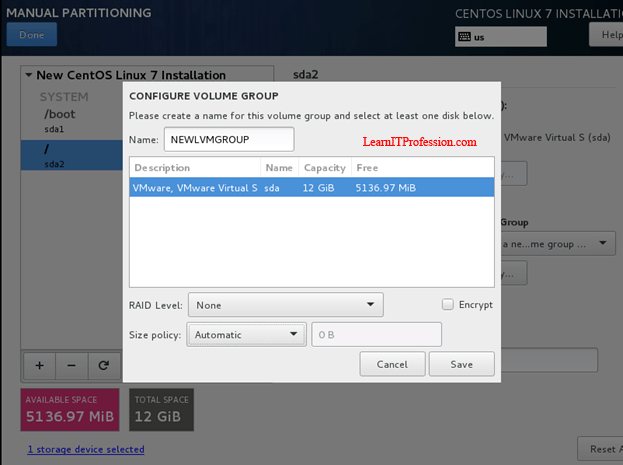
Here we also create the Volume Group inside LVM (Device Type) by using single Hard Disk, you can take multiple hard drives to create a volume group inside LVM (Device Type).
Set Device Type to "LVM", Inside the LVM (Device Type) create a new volume group in Volume Group section.
Create Volume Group:
Name: NEWLVMGROUP
Hard Drive: 12GB
Click on Save to configure the new volume group. After create the new volume group set the Device Type "LVM", Select volume group "NEWLVMGROUP", File System "ext4" and Lable "root" then click on update settings for finalize root partition.
Swap Partition:
Swap partition is an optional partition of Linux operating system, it require when system ram not full fill the system needs.
Calculation of SWAP partition are as follows
If System RAM is less then or equal to 2GB then SWAP Partition Should be Ram Size multiply by 2.
Example:
System RAM: 1GB
SWAP Partition: 1GB (Ram Size)* 2= 2GB (SWAP Partition)
If System RAM is greater then 2GB then 2GB should be add with RAM Size, this is for minimum size of SWAP Partition.
Example:
System RAM: 3GB
SWAP Partition: 3GB (RAM Size) + 2GB = 5GB (SWAP Partition)
In our case swap partition is 2GB because RAM size is 1 GB.
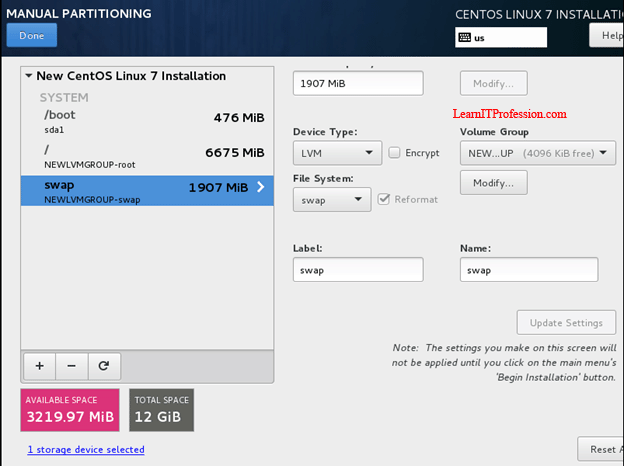
The requirement of SWAP Partition are as follows.
Mount Point: swap
Desired Capacity: 2GB
Device Type: LVM
Volume Group: NEWLVMGROUP
File System: SWAP
Label: swap
For create the swap partition click on + button, Set the mount point "swap" and set the value of Desired Capacity in our case is 2GB.
Click on Add mount point then set the Device Type "LVM", Volume Group "NEWLVMGROUP", File System "SWAP" and Lable "SWAP".
Click on update settings to configure the swap partitions.
Home Partition:
Home partition is use for users personal files and folders, users not have the rights to enter other user home folder until root or super user change the permissions.
The requirement of home partition are as follows.
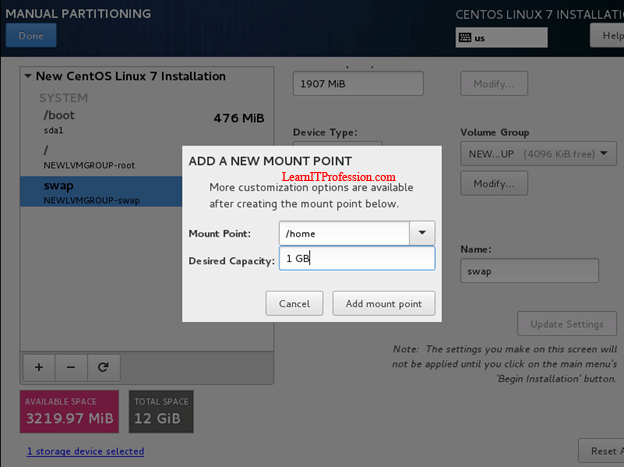
Mount Point: /home
Desired Capacity: 1GB (Set as per your environment need)
Device Type: LVM
Volume Group: NEWLVMGROUP
File System: ext4
Label: home
To create a new partition /home click on + button. Set the mount point /home and desired capacity as per your environment needs, Here desired capacity of /home partition is 1GB.
Click on Add mount point then set the Device Type "LVM", Volume Group "NEWLVMGROUP", File System "ext4", and Lable "home"
After set all the requirements of /home partition click on update settings.
Var Partition:
The var directory is the sub directory of root "/". The var directory contains cache files, log files, spool file (printer spool files) and tmp files in its own directories. /var partition is optional but for audit purpose it is necessary.
The requirement of /var partition are as follows.
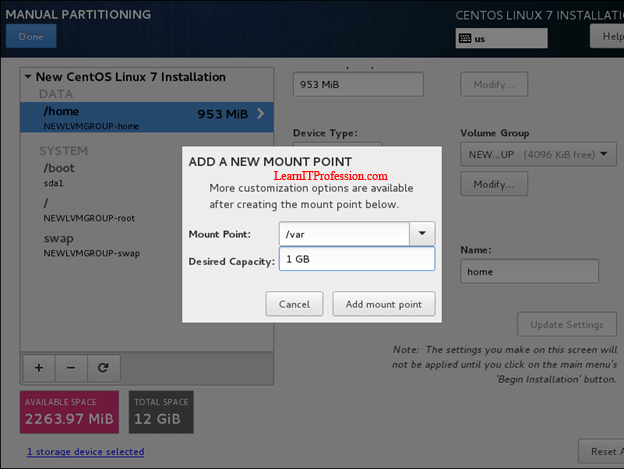
Mount Point: /var
Desired Capacity: 1GB (Set as per your environment need)
Device Type: LVM
Volume Group: NEWLVMGROUP
File System: ext4
Label: var
Create a /var partition click on +button. Set the mount point /var and desired capacity as per your environment need, here desired capacity of /var partition is set to 1GB.
Click on Add mount point then set Device Type "LVM", Volume Group "NEWLVMGROUP", File System "ext4" and lable "var". After set all the requirements of /var partition click on update settings.
SRV Partition:
SRV is optional partition for linux operating system, basic requirement of /srv partition is when linux machine is deploy a protocol like ftp, www and etc.
The requirement of /srv partition are as follows.
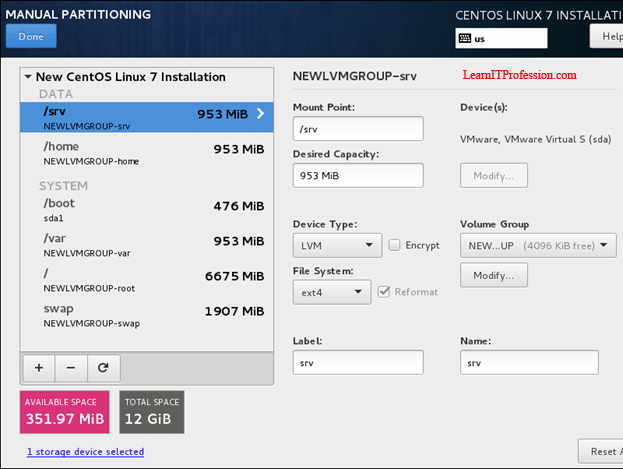
Mount Point: /srv
Desired Capacity: 1GB (Set as per your environment needs)
Device Type: LVM
Volume Group: NEWLVMGROUP
File System: ext4
Label: srv
Create a /srv partition click on + button. Set the mount point /srv and desired capacity as per your environment need, In our case desired capacity of srv partition is "1GB".
Click on Add mount point and set Device Type "LVM", Volume Group "NEWLVMGROUP", File System "ext4" and lable "srv". After set all the requirements of /srv partitions click on update settings.
Tmp Partition:
Tmp partition is use in Linux Operating System to store temporary files, until the operating system reboot.
The requirement of /tmp partition are as follows.
Mount Point: /tmp
Desired Capacity: 300MB (Set as per your environment need)
Device Type: LVM
Volume Group: NEWLVMGROUP
File System: ext4
Label: tmp
Create a /tmp partition click on + button. Set Mount Point "/tmp" and Desired Capacity as per your environment need, here desired capacity of /tmp partition is 300MB.
Click on Add mount point and Set Device Type "LVM", Volume Group "NEWLVMGROUP", File System "ext4", and Lable "tmp".
Complete the configuration of /tmp partition click on update settings.
After create and configure all require partitions as per the your environment need click on Done button.
Click on Accept Changes to Apply the Configuration of Partitions.
In Step 7 Enable and Set the value of KDUMP, KDUMP is Kernal crash dumping Mechanism. By default KDUMP is enable in Centos 7 Linux operating system installation and Kdump memory reservation is set on Automatic, you can set Kdump memory reservation value manually as per your environment need.
In step 8 Set the Network & Host Name of installation of Centos 7 with LVM. Click ON button if DHCP is available in your environment and set hostname, Here hostname is set as "Centos7-lvm". if DHCP is not available in your environment or you want to set IP manually click on configure button.
Configure the manual IP click on IPv4 settings, enter the IP settings as per your environment, if you environment contain Active Directory Domain Controller you can enter your domain name in Search domains.
Note: In Search domains if you enter your environment domain name, it's not mean that this Centos 7 Linux machine has joined in domain environment it mean this Centos 7 Linux machine just point through hostname in domain environment but you also need to create Host A record in DNS Server that available in Active Directory Server.
After set the IP configuration with DNS and Search domains settings click on save button.
In Step 9 Set the Security Policy. By default no security policy is configure. If you want to apply security policy click ON button then click Done button otherwise keep continue with default settings that is no security policy is apply in the installation of Centos 7 with lvm.
After set all the requirements Click on Begin installation.
During the installation process set the password of root and create another user that is optional.
Root is super user of Linux machine in our case Centos linux 7 machine. Set Strong password of root user. This is LAB environment so password does not matter.
Create another user if your environment need, here "centos" is create as another user with administrative rights, you can create another user with non administrative rights.
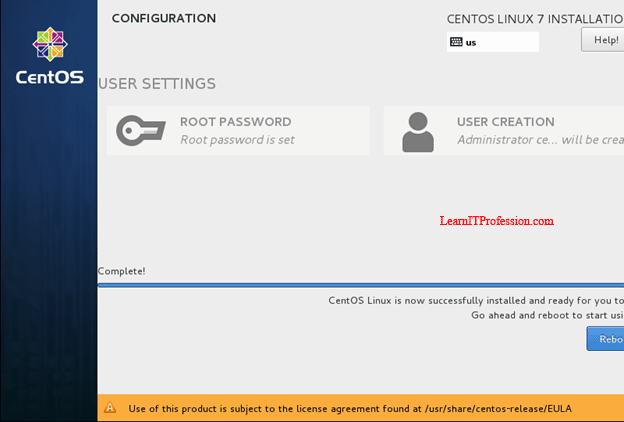
After complete installation click on reboot button but before reboot unplug the Bootable Device.
Login with root user and check the partitions with size by type the below command.
df -hT


















Comments
Post a Comment