Installation and Configuration of DNS for OpenLDAP
Installation and Configuration of DNS Server For OpenLDAP Server on CentOS 7/Red Hat 7
DNS stands for Domain Name System and the port of DNS is TCP 53 and UDP 53. DNS use to resolve the Hostname to IP address in forward lookup zone and resolve the IP address to Hostname in reverse lookup zone in other words DNS for OpenLDAP use to locate the Linux operating system in a network by use of Hostname and IP address.
In this Lab Environment DNS is installing on the same server of OpenLDAP. To check the host name type the below command.
hostname
To Configure the IP address with DNS settings edit the below mention file by use of vi editor.
vi /etc/sysconfig/network-scripts/ifcfg-ens33
The ifcfg-ens33 is a Network Interface Card (NIC) name, it is set during the installation process of CentOS 7. By default CentOS 7 give first Network Interface Card name is ifcfg-ens33. Configure the IP address and DNS Settings as per your environment. Set DNS1 is your OpenLDAP Server IP address that is also your DNS Server. Onboot must be set on yes.
For internet configuration on DNS Server configure the network file by use of vi editor. The file locate in /etc/sysconfig/network.
vi /etc/sysconfig/network
Edit the below lines in network file.
NETWORKING=yesGATEWAY=192.168.10.1HOSTNAME=pakistan.local
Change the gateway as per your network settings. In this network file Hostname is set as pakistan.local that is a domain name of this lab.
Set the hostname with IP address in hosts file that locate in /etc/hosts. Use vi editor to edit the file.
vi /etc/hosts
Edit the below line to configure the hosts file, you can change the configuration of hosts file settings as per your environment.
192.168.10.215 ldap-dns.pakistan.local ldap-dns
Install the DNS package bind on CentOS Linux 7 by use of below command.
yum -y install bind*
Installation of DNS Package bind has successfully installed.
To configure the main configuration file of DNS is named.conf that available in /etc/named.conf. Edit the named.conf file by use of vi editor.
vi /etc/named.conf
Edit the below lines at the end of file. pakistan.local is domain name of this lab environment, you can set as per your requirement. In the below lines forward and reverse lookup zone file names are also mention. Forward Lookup Zone file name is pakistan.local.forward and Reverse Lookup Zone file name is pakistan.local.reverse.
zone "pakistan.local" IN {type master;file "pakistan.local.forward";};zone "10.168.192.in-addr.arpa" IN {type master;file "pakistan.local.reverse";};
In this configuration file named.conf also set the listen-on port 53 to any and allow-query to any. you can also restrict listen-on port 53 to specific IP address with loopback address for example 127.0.0.1; 192.168.10.215; and allow-query to localhost with specific network for example localhost; 192.168.10.0/24;.
Type below command to check the main configuration file of DNS is named.conf. If error return means some mistakes in configuration file during edition.
named-checkconf
Create forward and reverse lookup zone files of DNS in the below mention location.
/var/named
The file names are also mention in the main configuration file of DNS is named.conf. The file names are as follows.
pakistan.local.forward (For Forward Lookup Zone).
pakistan.local.reverse (For Reverse Lookup Zone).
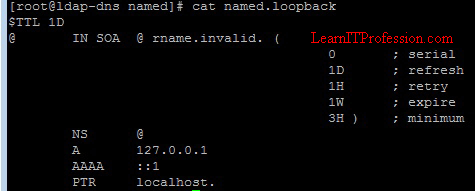
cd command is use to enter in the directory /var/named and ls command is use to list files and folders of directory. In the directory of /var/named the file named.localhost is use as sample file for forward lookup zone file and named.loopback is use as a sample for reverse lookup zone file that are pakistan.local.forward and pakistan.local.reverse respectively. To view the file named.localhost use cat command.
cd /var/namedlscat named.localhost
To view the file named.loopback use cat command that mention below.
cat named.loopback
To copy the sample files named.localhost to forward lookup zone file and named.loopback to reverse lookup zone file use cp command for copy the both files named.localhost and named.loopback to pakistan.local.forward and pakistan.local.reverse respectively that are mention below.
cp -rf named.localhost pakistan.local.forwardcp -rf named.loopback pakistan.local.reverse
In this Lab environment we use vi editor to create forward and reverse lookup zone files, you can create the both files pakistan.local.forward and pakistan.local.reverse by use of touch command.
To Create and Edit file pakistan.local.forward for forward lookup zone use vi editor, the command is mention below.
vi pakistan.local.forward
Edit the below lines in pakistan.local.forward file that is forward lookup zone file.
$TTL 86400@ IN SOA ldap-dns.pakistan.local. root.pakistan.local. (2011071001 ;Serial3600 ;Refresh1800 ;Retry604800 ;Expire86400 ;Minimum TTL)@ IN NS ldap-dns.pakistan.local.@ IN A 192.168.10.215ldap-dns IN A 192.168.10.215linux2 IN A 192.168.10.216
To Create and Edit file pakistan.local.reverse for reverse lookup zone use vi editor, the command is mention below.
vi pakistan.local.reverse
Edit the below lines in pakistan.local.reverse that is reverse lookup zone file.
$TTL 86400@ IN SOA ldap-dns.pakistan.local. root.pakistan.local. (2011071001 ;Serial3600 ;Refresh1800 ;Retry604800 ;Expire86400 ;Minimum TTL)@ IN NS ldap-dns.pakistan.local.ldap-dns IN A 192.168.10.215215 IN PTR ldap-dns.pakistan.local.216 IN PTR linux2
Firewalld is use as firewall in CentOS Linux 7, to allow the port of DNS in firewall use below commands. After allow the DNS ports in firewall must use firewall reload command.
firewall-cmd --permanent --add-port=53/tcpfirewall-cmd --permanent --add-port=53/udpfirewall-cmd --reload
To start the DNS service type the below command.
systemctl start named
To enable the DNS service type the below command.
systemctl enable named
Check the Status of DNS service type the below command.
systemctl status named
In the above image you can see that some lines is showing network unreachable resolving, actually we are not configuring IPv6. If you don't want to see these lines, disable the IPv6 in bind "DNS Server named File".
To Disable the IPv6 on Bind "DNS Server" named File click on >>Read
After disable the IPv6 in Bind "DNS Server", restart the DNS service and check the status of DNS service. The commands are list below.
systemctl restart namedsystemctl status named
Use nslookup command to check the DNS Server stability. The command is mention below.
nslookup ldap-dns.pakistan.local
To Configure DNS Server settings on CentOS Linux 7 client machine click here for >>Read
Thanks for read this Article


Comments
Post a Comment